home contact about wee before & after things to come wanna be featured? advertise

Friday, September 30, 2011

Monogram Vinyl letter behind glass frame


Christmas is 12 weeks from this coming Sunday!!! So I decided to get a jump on making some gifts!


This is my inspiration frame, I got at Hobby Lobby. It was on sale for 1/2 price so it was only $9.99.
Not bad, real wood, nice vinyl cursive initial, pretty ribbon. But I knew I could make it cheaper.


(sorry, picture will not rotate or center)

I scored a few thrift store frames for $.50 a piece. I removed the backs, and only used the glass and frame.
I spray painted them in Krylon Black Satin weeks ago, It is SO hard to find vinyl lettering in this town!! Anyone else have that problem?? I went everywhere. I was in the 'painting on fabric craft(y)' section today at Hobby Lobby and just happened upon them. Last time I was there, I spoke to the manager & hes said they didn't carry any, go figure! They were $8.89 for 2 letters and 1 Fleur de lis.


I positioned the vinyl center, then rubbed out any bubbles. I took E-6000 industrial glue from Hobby Lobby
(I chose that glue as apposed to hot glue, because it didn't set up right away). Besides, I can't stand burning my finger tips with hot glue. I only break it out when there is nothing else available.


I took some ribbon I had on hand and literally glued it to the back of the frame & let dry.
I also hit the 4 corners of the glass with it, to keep the frame in place.


I did not distress the frames as in the inspirational photo, but I may still, who knows.
These cost me $3.50 a piece, plus spray paint & ribbon. Not too bad for some cheap
thrift store frames! Also not to bad for knocking out a few Christmas gifts!!


Linking to:IhookedupwithHoHlamespiceChic on a Shoestring Decorating

Tuesday, September 27, 2011

Fall Sofa table

I showed a little bit of this sofa table when I did a post on The ASCP pumpkins, but I moved some of them to my mantle.

Here are the Metallic Jade pumpkins.


I have had this old trophy champagne bucket for years.
I was going to polish it, but I want the patina for Halloween...
I have no idea what this was originally used for. I bought it for $.50 @ a garage sale a few weeks ago. Tea light candles fit in it perfectly!
I love the old black chippy paint!


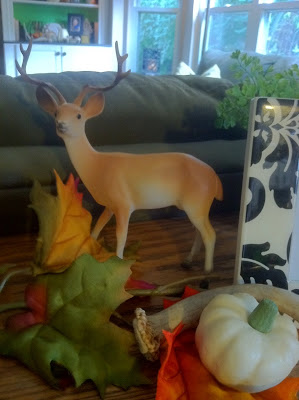
Another deer

And here is a shot of the whole table. I love the 2 shelves it has.
I am thinking it may need some paint though...


I wanted to show you a really easy inexpensive way to do a kids table & chairs.
Buy a regular size small table, like a side table & cut the legs down to size.
This used to be in Mr.s apartment before we got married, a TV sat on it. I think I got it for
$5 @ a thrift store.
I had him cut it down to accommodate the solid oak chairs I got @ the Red Barn
Antiques on HWY 63, close to central Missouri.

They used to be an painted an ugly brown color, but I chose a soft sage as I wanted
it to go with any decor. My kids eat on these, color, play games, spill juice, you name it! They are the most used table in our home! I thought of repainting them, but I am not ready to cover up all the memories of them @ that table. :0)
Visit thecsiproject.com

Monday, September 26, 2011

Antique built in Cabinets

One of my most favorite find is also my best find as far as value! About 7 years ago I stopped at a garage sale on a Saturday after work. It was apparent the guy was done for the day, he was already putting stuff up. 

The built ins were not side by side so it was hard for me to vision what they looked like. They came out of an old house in the city of St. Louis. There is no back to them, but it is custom made as they are not the same size. The left is slightly wider than the right. There are even adjustable shelves!


 I asked him how much & he said $35. Silence. Excuse me, how much? $35.
Me: OMG!!! what a steal! My only issue is I had a huge rocking horse in the way back that I was taking to an artist to paint it into a Zebra for my Morgan's nursery. I don't know how I did it, but it was not easy to get it all in a small SUV at 7 months pregnant!


When I got it home I had to wash it as it clearly had nicotine stain on it. Ironically it has never smelled of smoke. As I hit it with some Clorox spray, the nicotine just dripped down the cabinet. The paint and hardware are so perfect, I have never touched them in the 7 years I have had it. Although I find my self eyeing it from time to time & thinking IF I did paint it, what color would I do. Like I said my favorite piece & best score. Ones like it at Pottery Barn go for $1500!!


Anywhoo, it is in my breakfast area, near our kitchen table. The top is at about the height of a mantel & so big, it is like having another mantel to decorate. I decorate it for all the holidays & seasons. This year for Fall I used dried plants & silk floral stems tucked behind a large pumpkin. Simple. Easy. I do need to reorganize the contents as I store a lot of my antiques in there while I am not using them. Oh well, another addition to the list! Hope you like!!


Linking to:

vif187

Fall Mantel & Built Ins


My mantel & built-ins had seen better days. They became a hodge podge of kids games, books & just very messy!


The Mr. built these a few years ago. When I asked him to build some he looked at me
like I had 3 heads.


He said he was not a carpenter, but I knew he had SOME carpentry skills in there. He started with upper kitchen cabinets from Home Depot, a bathroom base stuck out way too much. He bought MDF for the top & shelves, bead board for the back of the shelves. I wanted them to be lit up, but not being glass, if I put a pot light in the ceiling, only the top shelf would be illuminated. Then I thought about rope lights. In order for them to have enough room to be mounted on the INSIDE of the trim, he had to leave a space between the front of the shelf ledge & trim piece. Some trim, rope lights, knobs, paint & now we have someplace to hide away all the kid toys.


Ok, on to the reveal. I lived with the white bead board but knew I wanted to paint it to make the objects on the shelves pop. In comes Annie Sloan chalk paint. I had 1/2 can left over from my Antibes green vanity makeover you can see here.


I did 2 coats with a little Old White & a touch of water added to the green.


I thought it would be quick & easy to slap some paint on them. Ha. Not so much. Because I had 3 shelves, 2 side walls, a top & bottom, there was a lot of cutting in that had to be done.


Here is a close up of the mantle, Not my best work. Can you tell I was done with the decorating & painting? I may still redo it a bit or just wait a week for the Halloween decor to go up.


Greek Blue Chalk Paint pumpkins you can see tutorial here.


The top of the cabinet base needed to be painted too, so I broke out some MORE ASCP in Graphite, a sample pot I got @ the workshop I attended. 2 coats & clear wax then it was on to the decorating.


Some of my deer collection. This is a very old Celluloid deer.


Now let me start by saying fall is my favorite time of year. I have LOTS of stuff. Mr. @ some point yesterday told me it looked like an episode of Hoarders. Meenie! OK, maybe he is right, but I think I was so excited to see my 'normal decor' against the new paint that when you add my fall stuff to it, it makes for very filled bookcases. But I like it. For now. Until the Halloween stuff is added to it! THEN it will look like an episode of Hoarders!


LOVE the shelves now, wish I did it years ago!


The light in the photos make the bead board look like it was painted different colors.
They aren't.

The bottom color is the closest match to the actual color!

Linking to:

UndertheTableandDreamingDomestically Speaking UndertheTableandDreaming

Stuff and Nonsense

Fall Vase

I wanted to pull a few nature inspired things around the house to put together a layered vase.


I had this teeny tiny pumpkin potpourri from last year. I don't know where they originally came from as I got them from my favorite thrift store.


Aren't they so adorable, baby pumpkins!


I also found the bundled sticks @ Goodwill for $1.10. If I hadn't found these, I am sure some found sticks would have worked too!


I added some Chinese Lanterns grown in he Mr.s Granny's house.
I topped it all off with some small pine cones.
Done. Cheap & easy!

LinkWithin

Related Posts Plugin for WordPress, Blogger...